A Keychain to Store Your Secrets

It is rare that I see a dialog that has been around for a long time in macOS that I have never seen. It happened to me yesterday. And the dialog itself was confusing.

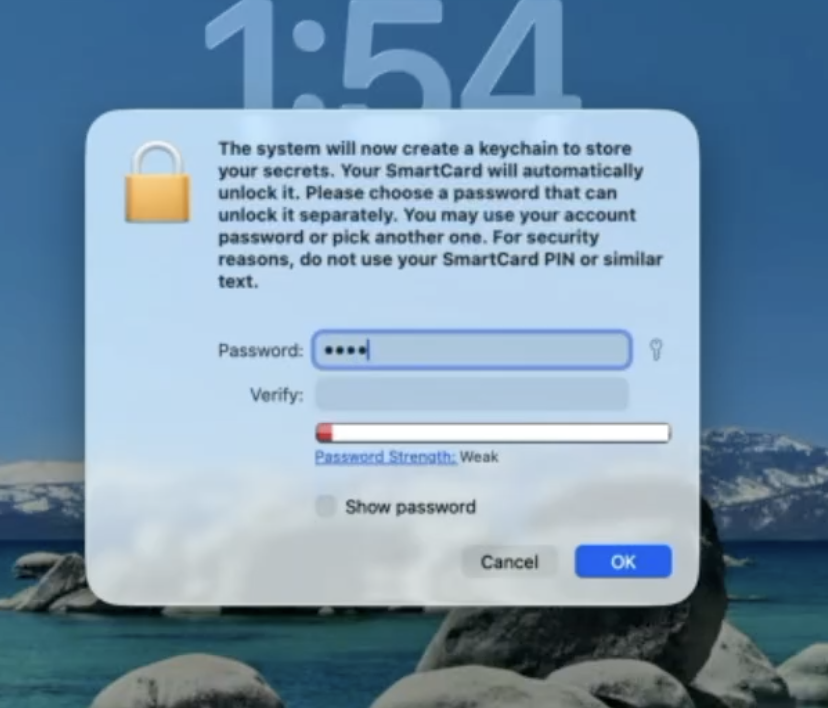
When logging into macOS with a SmartCard at initial login, I got a dialog that said:

“The system will now create a keychain to store your secrets. Your SmartCard will automatically unlock it. Please choose a password that can unlock it separately. You may use your account password or pick another one. For security reasons, do not use your SmartCard PIN or similar text.”

It turns out that you are supposed to enter in the user’s local password here. If you use a different password, it will work fine until you log in with a password rather than the SmartCard. Once you do that, the Login keychain that was created during the initial SmartCard login will get moved aside and a new keychain will get created with the user account password. The keychain will not get out of sync and logging in with both the SmartCard and a username/password will work fine.

If you are curious about how I figured this out, read on…

The dialog presented was confusing on many levels. It wasn’t asking for my login password but rather having me set a password for a new keychain. The user account already had a password but it wasn’t asking for that. I was logging in with a SmartCard, and I know that a SmartCard can log in without a password and can also unlock the user’s keychain without a password. So why did it need a password for a new keychain? On top of all this, there are 2 keychains for the user account (one “login” keychain that is file-based, and one “Local/iCloud” keychain that is secure enclaved-backed and based on the iOS keychain). Which keychain requires the password since two needed keychains were created (the Login keychain and the Local keychain)?

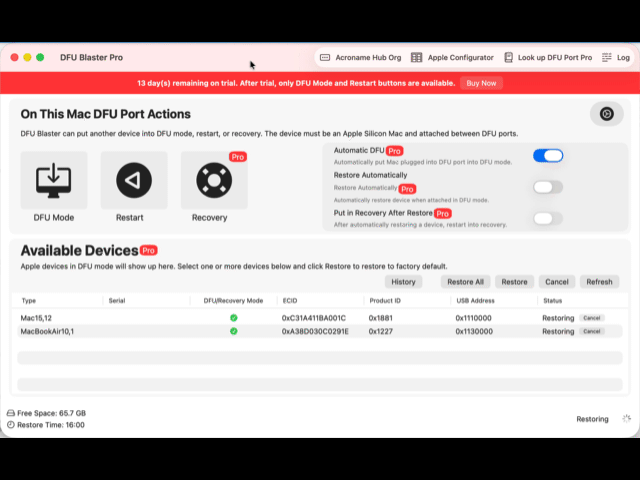
I am getting ahead of myself. Here is the problem I was trying to solve. I wanted to be able to have a Mac fully set up with the most recent macOS version and allow initial login with a SmartCard. Using our DFU Blaster Pro app, the Mac gets wiped and updated to the most recent version of macOS. After that completes, the Mac automatically enrolls in MDM using Automatic Device Enrollment. A local admin is created during device enrollment as well. After enrollment, a package is sent down to create a local user that has an attribute in local directory service that has the RFC 822 username defined on the user’s SmartCard. MDM also pushes down a SmartCard attribute mapping file that maps the RFC 822 username from the SmartCard certificate to an attribute on the local user account.

It worked great. The Mac was at the login window asking for the local admin username. I inserted a smart card and the login window changed to enter a PIN for the SmartCard user. After entering the PIN, I expected to wait a bit and then be at the desktop. However, I saw the “The system will now create a keychain to store your secrets” dialog.

I put in a new generated password from my brain and everything seemed to work fine. I was able to open Keychain Access and the keychain was unlocked. I logged out and logged in with the user’s password and checked the keychain, and it was again unlocked. How could a keychain have 2 passwords?

So I investigated. It turns out the Login Keychain didn’t have 2 passwords, but rather the keychain created when logging in with a SmartCard was replaced when I logged in with a user’s password. Here is what happened:

  1. When the account was created with a password during MDM setup, the account got a password and home directory, but no keychain was created.

  2. When the user logged in using a SmartCard, a keychain had to be created. While a SmartCard can unlock a keychain, you cannot open Keychain Access or view a keychain item without entering in a password. The system forces you to set a password when creating the keychain so you’ll have a known password to use to view passwords in Keychain Access. SmartCard can unlock the keychain but you’ll need a password to view the passwords in Keychain Access. I have no idea why macOS doesn’t prompt for the local account password and use that to set the password on the new keychain.

  3. When logging out and logging in with a password, macOS sees that you have a keychain with a password that doesn’t match the login keychain so the login keychain is moved aside and a new keychain is created using the login password. Any items in the login keychain are no longer available in the Login keychain, though are still in a separate keychain file in the keychain folder.

  4. When logging out and logging back in as a SmartCard user using a SmartCard, macOS sees that there is a keychain that cannot be unlocked using the SmartCard but has an unknown password, so it prompts the user for the password to unlock the keychain. This password is the login user’s password since it was created when logging in with a user’s password. Once the password is given, the keychain is updated to allow the SmartCard to unlock it. This keychain is now able to be unlocked with the user’s login password and the SmartCard.

So where is the password used that the user was forced to create when first logging in with a SmartCard? Nowhere. It is associated with a keychain that was moved aside and not used any longer. If the smart card user never logged in with a password, the keychain is never moved aside and still uses that “special” password. That keychain will be moved aside as soon as the user logs into the user account using a password. If the user had any items in the keychain, they will no longer be available to the system or in Keychain Access unless added manually.

What about the iOS style keychain versus the macOS-style keychain? It seems that all of this behavior is around the macOS-style keychain and the “Local/iCloud” iOS style keychain is not related. Though perhaps related, the Local/iCloud Keychain has a “legacy login keychain” entry that cannot be viewed regardless of the password used.

Perhaps that is an investigation for another day.

Additional note: I found out from the MacAdmins SmartCard slack channel that Platform SSO will prompt with this same dialog when creating a user at login window with a SmartCard.

I also created a video of the setup:

https://twocanoes.com/video/dfu-blaster-with-automatic-device-enrollment-and-attribute-mapping/

Designed for iPad

There has been a distinct push by Apple to make macOS more iOS-like. I have been using a Mac since the ’90s, it wasn’t something that I was particularly fond of. Apple made statements about “Let the Mac be the Mac”, but release after release, there was a definitive “iOS first” feeling.

With Apple Silicon, Apple brought the ability to run iPad apps on macOS (“Designed for iPad”). While this might seem like a great thing for macOS, it resulted in removing motivation from macOS developers to continue building macOS native versions of their apps. SwiftUI helped unify the interface work for all platform but it still required building and updating two separate targets.

Our Smart Card Utility app started on macOS. We now have a macOS and an iOS version. The iOS version is much more popular than the macOS version but I liked having a native macOS app to keep it Mac-like. It wasn’t always easy because some external devices we support have libraries for iOS only. We reached out to 3rd party library vendors to provide macOS native versions without much success. However, since some of the devices were Bluetooth devices, some vendors provided the Bluetooth profile characteristics and we created a direct Bluetooth connection instead of using the library. This worked for some external devices, but not all of them. Without native libraries, it was not possible to have full support of all the external devices across both the macOS and iOS apps. It was also not possible to use SwiftUI since that would require native libraries on both iOS and macOS.

This led to confusion and frustration with our customers and I realized that most of our customers would be fine with an app that looks like an iPad app on macOS since they are already used to that interface on iOS. It also means that our tutorials, documentation, and screen shots could be unified.

So we are now going to be building a single, unified version for iOS that runs on Apple Silicon Macs. Also, since Apple will stop supporting Intel macOS post-Tahoe, we will still have to keep the old version around for a while that runs on Intel.

It feels the scales have tipped and it is easier for both developers and customers to have an iOS version and support the Mac using Designed for iPad. I am not convinced on SwiftUI for macOS, since it is difficult to get it to look native on macOS. Without a bunch of platform specific implementations, the user interface ends up looking a lot like iOS anyways due to Apple unifying of a lot of the UI elements, making them look more iOS flavored.

I suspect it was inevitable but this marks an acceptance on my part on what the future looks like.

It looks like iOS.

XCreds on iPad

I was curious about the options for authenticating with a cloud provider to get access to an iPad (similar to what you get on macOS with XCreds). I got it working. Here is how it works:

  1. iPad is enrolled in MDM with Automatic Device Enrollment. This is required for putting into Autonomous Single App Mode. Autonomous Single App Mode means the MDM puts the app in Single App mode, but the app itself can exit Single App Mode. The user can’t exit the app or get access to other features of the iPad like Control Center.
  2. The app shows a web view to authenticate the user using their OIDC credentials.
  3. On successful authentication, the tokens are verified and if successful, the app allows the user to go out of Single App Mode.
  4. When the user is done with the session, they open the app again and the app puts itself into Single App Mode.

I found that if restarted the iPad when it is locked in Single App Mode, it goes back into Single App Mode. If the iPad is restarted when the user is logged in and not in Single App Mode, it will be out of Single App Mode when the iPad comes back up.

I created a short video showing how it works:

twocanoes.com/video/xcr…

Canada breaks with US, slashes 100% tariffs on Chinese EVs to 6%

Of course, this is going to make Washington furious. The US has been trying to build a “Fortress North America” against Chinese EVs. By letting 49,000 units in tariff-free (or near tariff-free), Canada is effectively saying it values affordable climate solutions (and canola exports) more than complete alignment with US industrial policy, which is understandable since the US was the one to go hostile on trade with Canada.

EVs are the future. That much is clear.

electrek.co/2026/01/1…

The Personal Price of AI (so far)

Let me get this out of the way, first: I use AI but it isn’t called AI. It is called autocomplete. It is called spelling and grammar correction. It is called finding photos by describing them. It is forced on me by algorithms in YouTube and Spotify.

What I don’t do is allow statistical models to take over my decisions. In the last few months, I have been on the receiving end of the carnage brought about by the rush to allow statistical models to make decisions.

The first example is a contract. I was entering into a large contract for a 3 year plus term and was sent the first draft. I sent it over to a lawyer to review. I had looked over the contract to prepare for our meeting to discuss the contact, and it looked like what a contract should look like, but had some weird clauses in it. When I got a call from the lawyer, he said that he suspected it was written by ChatGPT (or another LLM/word predictor) service. It had vague language, included unrelated items, and had sections that didn’t make any sense. My lawyer called the other party’s lawyer, and they said that they had not seen the contract and would never recommend that their client sign the contact their own client had sent over.

Our lawyer had to rewrite the contact and it ended up costing me a bunch of money that was unnecessary. It was clear to me that the other party saved a bunch of money by using ChatGPT on their side, and it ended up shifting the responsibility (and cost) to us. They also ended up paying their lawyer to review the changes.

The other example is related to IT software. A few days ago, I was on a support call to discuss an issue with our software. A web page was redirecting to another web page and that page never loaded. It only affected one user and only on one machine. It was very strange. After an hour of troubleshooting, we narrowed it down to a web filter client on the machine and, after disabling it, everything worked fine. The customer went off to investigate and reported that the next day, multiple machines had the same issues across multiple users, machines, and software. It turns out that the web filtering vendor had pushed out an AI update that determines the rules for blocking traffic. It was unrelated to our software and both myself and my customer spent days going back and forth, and spent an hour on the phone, to determine that the statistical model was being used to block traffic in unexpected ways.

Just because something looks correct doesn’t mean it is. Be skeptical and verify. Test. Review.

Tim Versus the Algorithm

I spent a bunch of time importing music from the Solomon Islands, Vanuatu New Caledonia, and Papua New Guinea. I got far enough into it that I wanted to start listening to the newly ripped music both at home and when I was out and about. I have VLC on my phone that I use to play some music, but that meant I have to import each song to each device. I also want to remove myself from the algorithm-based services.

It felt like I was going backward, looking at local music storage and manually syncing. The internet I want isn’t centralized with a few services controlling what I see and hear. A decentralized internet would give me autonomy and control. So instead of loading up my music on an old MP3 player and yelling at the clouds, I did something better. I installed an open source web streaming service at home with an overlay VPN that gives me access to it on all my devices. No Spotify. No Apple Music. No algorithm deciding what I hear next.

Here is how it works:

I installed Jellyfin media server on my home debian linux desktop and imported all the music that I have. I installed the iOS app on my phone and pointed it to the media server. All my music was instantly available. It even has an offline mode. But since I have installed Nebula, I am able to get to any of my devices regardless of what network I am on. Nebula is very sweet. It isn’t a VPN that connects networks, but is an overlay network that connects any host you install it on to the same virtual network. There are clients for most platforms (including iOS and Linux) and is open source.

I am now living in a future where I have a network that has all my devices on it, controllable and accessible by me, without a cloud service pushing their crap to my devices. I am now looking at replacing my home automation, smart speakers, and even my phone so that I actually own my devices and the service they connect to. I am NOT going off the grid, but setting up my own grid in a decentralized way. You know, like the internet we helped build.

Imagine that.

Pass Tap App and Stand

Over the holidays each year, I try and work on a project that is interesting and requires a bunch of uninterrupted time. This year, I decided to investigate a way to solve NFC on iPad. The idea was to simply hand someone an iPad and have them authenticate quickly. I had already written proof of concept app for using AutoFill on iPad, CryptoTokenKit driver for CCID readers for RFID tags, and an app that could send the correct APDU commands. However, I still wasn’t happy. The reader is connected via a USB cable with an adapter. I wanted something that showed that you could do a quick handoff of to an NFC enabled iPad.

I found a CCID (smart card USB) NFC board from ACS and it worked great with my CryptoTokenKit extension. It was small and had a board connector to USB-A. The Apple multimedia connector has USB-C, USB-A and a place to pass power through. I hooked it all up and it worked fine, but it’s a mess of cables and connectors. I then designed a case and did a bunch of 3d prints. I ended up with an enclosure that attached to the back of the iPad, was completely self contained, could power the iPad, and you could just tap an RFID card or tag.

When trying it out, there was something magical about having it all together and to log in to a website or app with a tap. I found myself going back and authenticating again since the process was so smooth.

I made a video and an article on our site showing the whole process:

twocanoes.com/knowledge…

That article has a link to the app and to readers that work. We have a few customers that are excited about it and I just love the feeling of passing them an iPad, having them tap it, and allowing them to get right to work. Works like it should.

DFU Blaster UI and Keyboard Shortcuts

I am working on an update to DFU Blaster to reorganize the UI a bit to make it a bit more compact (DFU Blaster Pro is an app from Twocanoes Software to easily put a Mac into restore mode and automate the restore process). SwiftUI makes putting keyboard shortcuts in the menus difficult so I added in the keyboard shortcuts but didn’t have a good way to add them to associated menu item. SwiftUI seems to lean towards menu-less apps (iOS influenced?) and it wasn’t worth it to me force a mac specific feature.

I took a look with fresh eyes and using SwiftUI @State, I can detect when the command key is down, set a state, and then show the keyboard shortcuts in next to the UI element it triggers. I neat side effect is that all the keyboard shortcuts require the command key, so you are about 1/2 way to typing the shortcut when hitting command.

As always, the current beta is here

Sony Walkman

listening to some sweet 90s music from the solomon islands on my sony walkman. totally normal thing to do in 2026.